Most all families have many trucks and cars scattered throughout their house. Many never touched, few ever played with. Or maybe your child loves them and you keep buys more to maintain interest. Here are some ideas to deepen truck play without purchasing any more things!
Experiment with ramps: Using cardboard or wood create some ramps in your play space. Not only are ramps easy to make they help infants and toddlers to experiment with physics and gravity's effect on their trucks and cars
Talk to your child about what the trucks are doing. What jobs does the truck have? Where are they going today.
Spur deeper play by adding card board boxes for garages.
Local hardware stores will give away keys that were messed up.
Use scrap paper, shredded paper, pieces of cardboard, or rocks to hull in the truck.
Add truck books that go beyond just the truck names. Some great truck books with a plot include Little Blue Truck, Little Blue Leads the Way, Goodnight Goodnight Construction Site, My Truck is Stuck, Truck by Donald Crews, Grandma Drove the Garbage Truck, Trucks Roll, Truck Stuck, Truck by Byron Barton
For children under two their play is typically physical. They want to understand gravity and movement. They are negotiating space for their body and the vehicles. They want to hold it, open it, flip it over, and check each part.
Older children (especially boys) will use the truck as a part of a large drama. The truck has a job; the child is making decisions and overcoming challenges. As children get to this age you want to help them to plan for the truck's work and what they are going to do. Challenge them to represent that work in another way, acting it out for dad, writing their own truck book, telling mom the story of the truck's day, and drawing the truck. This helps children to think deeper about their play.
If you want to spark interest in a toy that has lost interest consider moving it to a new place, setting the scene with a garage or ramp, and closely observing the child's play. See where they are and help support them as their ideas develop.
Thursday, November 1, 2012
Sunday, May 13, 2012
Where to find stuff when you need to buy something or materials to make something!
•Free Stuff -best for projects, craft ideas,
when you aren't looking for something specific.
•Freecycle Charlottesville
•Local Businesses- Tell them you're a teacher,
Lowe's Keys, Expired Seeds
•Staff, Families, Friends , or Community
Partners
•Disposable Products (papertowel rolls,
formula scoops, contact spray)
•No longer needed (extra towels, baskets,
fabric, etc)
•Reuse & Recycle -great for everyday
things, expanding on a theme or project, saves a lot of money
•Craigslist - Don't shy away from sets, post a
wanted ad
•Goodwill, Salvation Army
•Garage Sales and Consignment Shops - Go
toward the end and bargin with the sellers to get the best price.
•Local resellers, Circa and the Habitat Store
and SPCA
•Buy -when you must buy, go natural, local,
and handmade
•Wood, metal, and fabric whenever possible.
•Discount websites have promotions - Zulily,
Totsy, Woot Kids
•Shop Local! Stella Blue for instruments,
Circa, Martins Hardware
•Micheals and JoAnns offer teacher discounts
and 40-50% off promotions great for baskets, organization, fabric, bells, etc.
•TJ Maxx, Home Goods, Ross, Marshalls have
discount books, toys, and home items.
•Etsy.com has homemade stuff from anywhere
online
•Amazon when you must get it soon is usually
the best price.
Saturday, April 21, 2012
Does your child love taking every tissue out of the tissue box? What about rolling all the toilet paper off the roll? Who doesn't!?
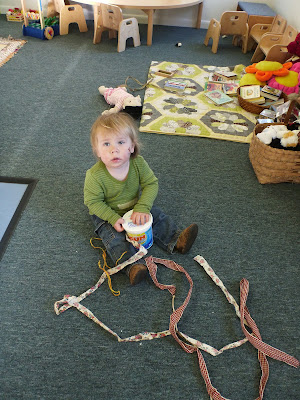
This very simple homemade toy will help your infant or toddler explore that concept over and over again with out going though all your paper towels.
Use any type of container with a plastic lid and make holes in the top, the container pictured right is a formula container (we use those for tons of stuff) then place a long ribbon inside and push it out through the holes. The toddlers exploring below use yogurt like containers with a simple cross hole. The infants holes are a bit larger for pieces of rope but the smaller are probably more fun to pull through.
You can also get creative with knots or bells on the strings.
When we are done we encourage them to help us put the ribbon back for the next friend to use it. If you knot the ends together they will pull the top off when they are finished!
Thursday, April 19, 2012
Frozen Toys
It is getting hot out there and we have an idea for you! One of our favorite things to do is explore ice! You can simply use a large tupperware type container to freeze a small block of ice and allow your little ones to explore it on a hot day. Want to make it even better? Add toys to the container before you freeze it and let your little one try to understand why their familiar toy has changed in this new and exciting way. If you leave part of the toy sticking out toddlers also love the job of getting the toys out! Melting and chipping away at the ice we explore science through hands on discovery.
Theses slipperly little toys are great for teething infants, curious toddlers, or exploring preschool investigating melting and floating.
Frozen toys make the hot summer weather simply more fun!
Tuesday, April 10, 2012
Drums
Every child in the world just loves to bang, bang bang. Check out these simple drum ideas. You can make drumsticks too!
This little drummer on our right it using a metal planter, beside her you can see a recycled coffee can we also use for drumming. In the bottom photo and in the back of the top photo you can see some other options we have. Recycled formula containers. The one pictured is covered with shiny contact/shelving paper. Tin cookie jars, other types of tins such as popcorn. We also use small cardboard boxes or shoe boxes for drumming. Any type of metal or wooden try will work too.We make our own drumsticks too, usually out of a dowel (from any craft store ~ $1) cut to about 12 inches then covered with any type of material. We typically use hot glue to apply it. You can cover your sticks with burlap, cloth, wire, ribbon, we have used rubber bands with superglue under and wrapped tightly as pictured. If you want to make a round pad on one end use a few cotton balls or a piece of fabric then a small piece over top hot glue and either zip tie or twisty tie the bottom. You can use a piece of string/yarn but some little ones will get that off.
Lastly pair your drums with books to encourage deeper learning. Our favorites include "Hands, Hands, Fingers, and Thumb" and "Be Quiet, Mike" Older children can help to make and decorate the drums, simply get a coffee can or formula container and cover it with paper to let them decorate. Each of our toddlers (1-2 years) has proudly created their own drum.
Monday, April 9, 2012
Welcome
Welcome to a new blog designed to share homemade toy ideas with parents and families. Our ideas mostly will come from the classrooms of Our Neighborhood Child Development Center (www.OurNeighborhoodcdc.com) a Reggio inspired infant toddler program that uses natural and recycled materials and homemade toys in every
"Things that are found are simply more interesting than things that are purchased."
Subscribe to:
Posts (Atom)